Materials needed for this project are simple. You will need a Dremel tool or some other small, high rpm drill. You will need small carbide burrs (grinding bits) – 1/16” and possibly a 1/8” size. You will need masking tape, a file, sandpaper and some slow cure epoxy. You will also need something to color the epoxy. Commercial epoxy colorant can be purchased from most knife maker supply houses, but you can also improvise. The first inlay I did was with copy machine toner. I found a toner cartridge that someone had thrown in the trash. It still had about a tablespoon of the toner in it. The toner is intensely black, and it only takes a little mixed with the epoxy to make it completely black. I have also used bone and antler dust, ground up rock, metal filings and even kitchen spices. Use your imagination and be sure you do a practice piece before trying a mixture on your favorite knife or cup.
Photo 1 shows the old cup I had been using for the last 7 or 8 years. It looks pretty crude and clunky next to the new one, but then of course part of being engaged in bushcraft is to constantly examine and refine your equipment. Photo 2 shows the pattern I drew to put on my handle. The design is from an ancient petroglyph found near my home. I have this design on many of my self-made items. It’s a part of the local culture, and was a symbol frequently used by the original bushcrafters in my area – a beautiful connection to both art and people. Choose any design you like for your inlay, just be sure that no part of the design is smaller than the carbide bits you will be using to cut the inlay cavity.


Photo 3 shows the two typical bits used for inlays. These are commonly found in hardware and discount stores. Photo 4 shows the first cut with the Dremel. The tool will tend to jump and crawl a bit, so again, it is wise to do a practice piece to learn just what you have to do to accurately follow the lines you have drawn. Photo 5 shows the left thumb being used to steady the tool. This is similar to the push-pull thumb cuts used in carving, and it adds a good measure of control that you won’t have with just one hand on the tool.


Once you have completed the cutting with the Dremel, you may find that you have some rough or ragged edges. You can smooth these out with a piece of folded sandpaper, but be absolutely certain that you keep the sandpaper COMPLETELY VERTICAL. The edges of the cut that you made with the drill must remain at a 90 degree angle to the surface. If you round the corner of the cut, the epoxy can chip out of that area and ruin your project.
Next (photo 6) you should use masking tape to cover any part of the piece that may get epoxy on it. If you are using a close-grained wood such as birch, the epoxy can be sanded off, but it will save work to protect the area with tape. Be sure that the tape does not overlap the edge of the cut. It’s best to leave a space of 1/16” or so between the tape and the edge of the cavity to insure good adhesion.

The next step is an absolutely essential step that is sometimes skipped by beginners to this craft. A tiny dam MUST be built all around the cavity (photo 7). Since most items receiving this kind of inlay are curved, the epoxy must be poured deep enough to eventually be sanded down to the original curvature of the item being inlayed. If there is no dam to hold back the liquid epoxy, it will run off of the curvature, and the design will have an ugly depression in it. Even though the cup handle has a only a slight curve, the dam is still necessary. In the acutely curved knife handles you see at the end of this article, the inlay follows the original curvature of the knife handle, making a smooth, seamless finished product. I make the dam by rolling bits of masking tape with the sticky side out. Any gaps between the rolls are filled with more tape. Just make sure that there are no spaces for the epoxy to run out. It is a fairly thick liquid so it isn’t difficult to keep it from leaking out if you close all gaps with the tape.

When the cavity and taping are complete, it is time to pour the epoxy. Be sure that you use ONLY slow cure epoxy. The five minute variety may set up before you are finished pouring. I use Devcon “Two Ton” epoxy with a 30 minute cure time, but any brand with a 30 minute setup time should be fine. Epoxy has a consistency similar to honey – and the warmer it is, the better it flows. To be sure that it flows to all parts of the carved cavity, it must be warmed before you mix it. A temperature of around 90 - 100 degrees is good. I usually warm it near the wood stove, or it could be set in the sun on hot summer days. Once the epoxy is warm, get everything ready and mix part A and part B on a piece of unpainted plastic. When the two parts are thoroughly mixed, add the color. Mix only enough color to reach the shade you want – no more. Then drool a thin line of it into the smallest parts of the cavity (photo 8). When the cavity has been filled to about 1/8” above its highest point, take a very thin sharpened stick and GENTLY AND SLOWLY push the epoxy into the narrowest parts of the cavity (photo 9). This is necessary because even when it is warm, it may not flow into narrow areas on its own. DO NOT use quick jabbing motions to do this – that will cause bubbles that will still remain in the completed inlay.


At this point make sure that the piece you have just filled is as level as possible while the curing takes place. Once you have set the piece down and leveled it, do not handle it while the epoxy is curing. In 24 hours you should be able to begin the final step.
After a full cure, take off as much tape as you can. Then using a smooth rasp, coarse file or coarse sandpaper, grind off the excess until you can see the outline of your design. When using sandpaper it is essential to back it up with something flat and rigid such as a file (photo 10). If you simply use your fingers behind the sandpaper, whichever material is softer will dish out as you sand, making your final inlay uneven and wavy. Once your figure has appeared, use progressively finer sandpaper to finish your project. I like to go through 600 or 800 grit sandpaper and then use a polish cloth. Another option is to keep sanding with grits to about 2000. If your inlay is done in bone or antler, a good hand rubbed polish is all you need to finish the job. If your inlay is in wood, use a hardening oil on the entire project, including the inlay. Be sure to use food safe oils if you are inlaying wooden eating ware.

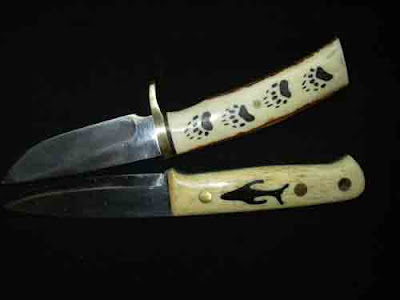
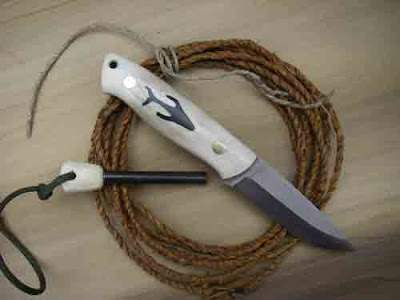
Photos 11 and 12 show views of the inlay on my finished cup. Photo 13 shows two home made knives inlaid with the same process. The whale on the bushcraft knife was colored with copy machine toner, and the footprints on the hunting knife were inlaid with pieces of ground up shale found on a beach near my house.


Final photo: Last year I purchased a fine Enzo blade from Ben’s Backwoods. I used some local reindeer antler as handles, made a hardwood lined sheath and of course inlaid the handle with an epoxy inlay. The knife was then donated to a charity scholarship auction. The knife brought more action at the auction than any other item presented for sale that evening and it finally sold for $700. A bit of well-planned embellishment can add a great deal of personal value to your own bushcraft gear as well.


7 comments:
I recognise that knife from a very good tactical knives article.
Nice piece, I'd never realised it could look that natural!
What an amazing tutorial - thanks for sharing it with us all!
Cheers,
Mungo
Gorgeous work!
PMZ
that's neat. thanks for sharing!
Jim-
I enjoy your articles very much!
Best-
Todd
Woa! Such awesome and beautifully skilled creations Sir! Are You the Teachin' guy or what? :-) Super tutorial and wonderful photography. You've got yourself another follower, friend Ben!
Sincerely,
lb
I'm going to try some etching on my knife with some muriatic acid. We'll see what happens. Nice inlay work.
Post a Comment